
Lightroom Tips - Noise Reduction

| Type of post: | Teaching Resource |
| Sub-type: | Lightroom |
| Posted By: | Hemant Kogekar |
| Status: | Current |
| Date Posted: | Sat, 10 Nov 2018 |
RAW Noise reduction in Lightroom
Noise reduction in Lightroom is recommended as one of the first steps in post-processing workflow. There are two types of noise. Colour noise and Luminance noise.a. Luminance Noise
To see luminance noise zoom into the sky or any other part of the image that should be smooth. If that looks a bit cloudy or muddy. The image has luminance noise.
- Go to the detail panel in Lightroom.
- In the Noise reduction settings –
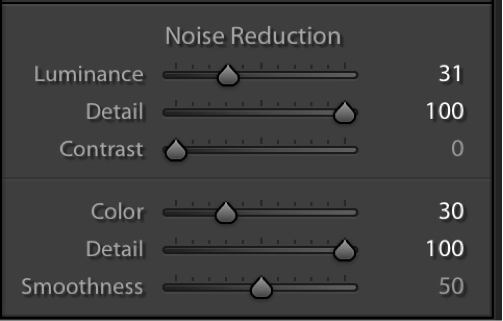
- move slider for Luminance to 30
- Details to 100 (maintain maximum detail)
- Contrast = 0 (no change)
- If there is still noise, move up the Luminance slider until there is no noticeable impact on the image noise. Generally a setting between 30 and 40 will get rid of the noise. (To see the noise more clearly, in the Basic panel increase the contrast to 100. But remember to reduce the contrast after you have changed the noise reduction settings).
Luminocity Noise in sky After noise reduction


Noise reduction Panel in Lightroom
b. Colour Noise
Colour noise shows as messy Magenta or green shades in an area that is supposed to be uniform in colour.
Settings are similar to above in the Colour section in the detail panel.
- Colour = 30 (adjust as necessary)
- Detail = 100
- Smoothness=50 (unchanged)
(For more clear colour noise, increase Vibrance in the basic panel to 100).
If you reduce the noise early, this will avoid images getting ugly noise artefacts as you process the image further in Lightroom or in Photoshop.
Hemant Kogekar
